This test kit includes everything needed to find out if water contains any undesirable levels of 12 different elements. Two different water samples can be tested (except bacteria) and the results can be compared to the Maximum Contamination Guidelines set by the European Union / UK. The instructions include a chart where test results can be recorded.
The tests are a safe, reliable and accurate way to detect the quality of water.
Important
- Keep tests out of reach of children and pets. Do not ingest anything from this test kit. Do not drink water sample used for testing. Store and use at room temperature 15-30°C (60-86°F).
- Do not open packets or a vial until you are ready to perform the tests.
- Do not touch test pads.
- Do not use on hot water or water containing bleach detergents.
- Do not re-use any part of the test kit.
- Read and follow the instructions which are included with each test kit carefully before starting any of the tests.
The test strips follow our simple and easy-to-use Dip-Wait-Read method.
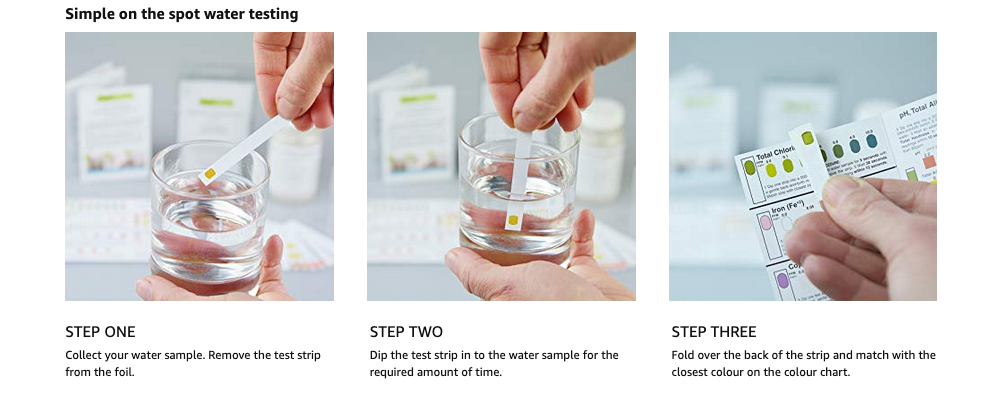
pH, Total Alkalinity and Total Hardness Instructions
- Dip one test strip into water sample with constant, gentle back-and-forth motion for 5 seconds.
- Remove, shake once briskly; wait 20 seconds.
- Match colour for pH, Total Alkalinity and Total Hardness in this order with colour chart provided in kit.
- Complete colour matching within 10 seconds.
Nitrate/Nitrite (as N) Instructions
- Dip one test strip into water sample for 2 seconds
- Remove, wait 1 minute (2 minutes if water temperature is below 12°C /55°F), then match colours for Nitrate/Nitrite.
- Colours are stable for 2 minutes.
Free Chlorine Instructions
- Dip one test strip into water sample with constant, gentle back-and-forth motion for 20 seconds.
- Remove, shake once briskly; wait 20 seconds.
- Match Free Chlorine colour with closest colour in colour chart.
Iron Instructions
- Dip one test strip into water sample for 5 seconds with a constant, gentle back-and-forth motion.
- Remove the strip and shake once, briskly, to remove excess water.
- Wait 15 seconds then view through the aperture to match with closest colour in colour chart.
- Complete colour matching within 15 seconds.
Sulfate Instructions
- Dip one test strip into water sample with constant, gentle back-and-forth motion for 10 seconds.
- Remove, shake once briskly to remove excess water, wait 20 seconds.
- Match colour for Sulfate.
- Complete colour matching within 30 seconds with closest colour in colour chart.
Copper Instructions
- Dip one test strip into a water sample for 15 seconds with a constant, gentle back-and-forth motion.
- Remove the strip and shake once, briskly, to remove excess water.
- Wait 30 seconds then view through the aperture to match with closest colour.
- Complete colour matching within 15 seconds with closest colour in colour chart.
Total Chlorine Instructions
- Dip one test strip into water sample with constant, gentle back-and-forth motion for 5 seconds.
- Remove and wait 30 seconds.
- View through the aperture to match with closest colour.
- Complete colour matching within 15 seconds.
Hydrogen Sulfide Instructions
- Fill supplied vial up to the top line with water sample to be tested.
- Dip one Hydrogen Sulfide test strip into one vial for 20 seconds with a constant, gentle up and down motion.
- Remove the strip from the vial.
- With the colour chart on a flat surface, place sample vial on the white circle.
- Look down into the vial and compare the colours.
Bacteria Instructions
Please refer to detailed instructions on the Bacteria test bottle. The bacteria test bottle contains Absence/Presence media (well-known for its reliability as a bacteria test media). Please follow the test procedure carefully as outlined. Ensure hands are clean by washing them with soap and water. If testing water from a tap then turn to a slow and steady stream.
- Take the bacteria bottle and carefully remove the cap (do not touch the inside). Carefully fill the bottle to 1.3cm (1/2 inch) below the neck (approx. 100ml). DO NOT OVERFILL and DO NOT SPILL the bacteria growth media in the bottle.
- Replace the cap and secure tightly.
- Shake the bottle vigorously until the media is dissolved (about 20 seconds). The solution should have a clear yellow colour.
- Place the capped bottle in an area away from direct sunlight and where it cannot be disturbed, at 35°C/95°F for 24 hours or at 25°C/77°F for 48 hours (+/-3°C/5°F) .
- After 48 hours incubation (a period when bacteria, if present, can multiply and produce in the media, causing a colour change), observe the colour of the liquid.
- Clear yellow = negative, no harmful bacteria growth detected.
- Blue-green = positive, it is highly likely that harmful bacteria (coliform) caused the colour change and the tested water should be considered unsafe.
For positive results:
- Should the result be positive, then the presence of E.coli can be detected using a blacklight with a wavelength of 365 (like the NVF-4 blacklight).
- Contact your local health authority or water treatment facility for further advice and for more precise bacterial confirmation (count and type).
Click here to go back to Simplexhealth 12-in-One Water Quality Test Kit
Please note: that this is a screening test and can not be used to certify water as safe or unsafe for drinking. This test kit provides approximate results ONLY when used in strict accordance with instructions. SimplexHealth expressly disclaims any liability resulting from the use of this product, failure to follow instructions, or reliance of test results. This is not a measuring instrument. Store in a cool, dry (below 32°C) place and away from excess heat and direct sunlight. No MSDS required. Keep away from children and pets. Avoid contact of test areas on strips with skin & eyes, do not ingest or expose to acids.